Let's Play With mkcert
Installation
You should probably use the official, and up-to-date installation guide, but at one point in time these commands worked for installing the CLI tool.
- macOS
- Linux
Install a Root Certificate Authority
The first step to using this tool is to create a Root Certificate Authority, and have it become trusted by the system you're currently running:
- macOS
- Linux
Parts of a Root Certificate
Now let's use openssl to inspect the certificate that was made:
- macOS
- Linux
Here's the certificate from one of my runs on my mac host:
Version Number
We know that we're using v3 of the specification.
Serial Number
This Serial Number is guaranteed to be a unique positive integer, and cannot be longer than 20 octets.
Signature Algorithm
This tells us that SHA-256 is going to be used as the hashing algorithm, and RSA will be used as the algorithm for encrypting data.
Issuer
Here we see that Issuer has some attributes set, of course none of them make a lot of sense. Because, your name/laptop
isn't exactly an Organizational Unit, but it's good enough.
Validity
The Validity of the certificate is the first line of defense for determining if we should trust the certificate. If the current time is outside the bounds of the certificate, it should no longer be trusted.
Here we see that this certificate is good for 10 years.
Subject
Again, none of this makes sense, but none of it matters.
Subject Public Key Info
Next is the Subject Public Key Info object, which has an RSA Public Key.
The RSA key, as the specification implies, is literally just 2 numbers, the Modulus and Exponent. The Modulus is
randomly generated, and in this case happens to be 3072 bits long, but in other cases might be shorter or longer. And
the Exponent is typically always set to 65537.
info
Why is the Exponent always set to 65537? Because compromises had to be made. Here's
the Crypto StackExchange discussion.
Extentions
Finally some juicy bits. We'll see that this certificate is configured to be a Certificate Authority.
The pathlen of 0 means this certificate cannot be used to create additional Certificate Authorities.
Take note of the Subject Key Identifier: 3C:30:C0 because we'll see this be referenced in our
End-entity certificate in a few minutes.
Parts of a End-entity Certificate
Let's now create an End-entity Certificate that we'll use in an Nginx server.
mkcert will create certificates in your current working directory. If you'd like you can
mv into the examples/mkcert-nginx
directory so that you can take advantage of the existing Nginx configuration file.
Let's take a look at the certificate:
Should produce something like this:
Serial Number
Make note of this, we'll see it soon from our browser.
Issuer
Matches the Issuer of the Root certificate.
Validity
You'll see that the Not Before date is back dated
to June 1st because of the macOS policy update.
Key Usage
This lets us use the certificate as a webserver.
Basic Constraints
We can't use this certificate as a Certificate Authority.
Authority Key Identifier
We see that this matches the Subject Key Identifier of the Root certificate.
Subject Alternative Name
This tells us what domain names and IP addresses the server can present this certificate as. Meaning if the server serves requests with this certificate from anywhere other than:
localhost127.0.0.1::1
and the client is validating certificate server names, then the client should disconnect from the server.
Start an Nginx Container
From within the examples/mkcert-nginx folder you can find an existing Nginx configuration file.
From within that directory you can start an Nginx container like this:
And then open a browser to https://localhost:4448
You should then be able to inspect the certificate and see something like this:
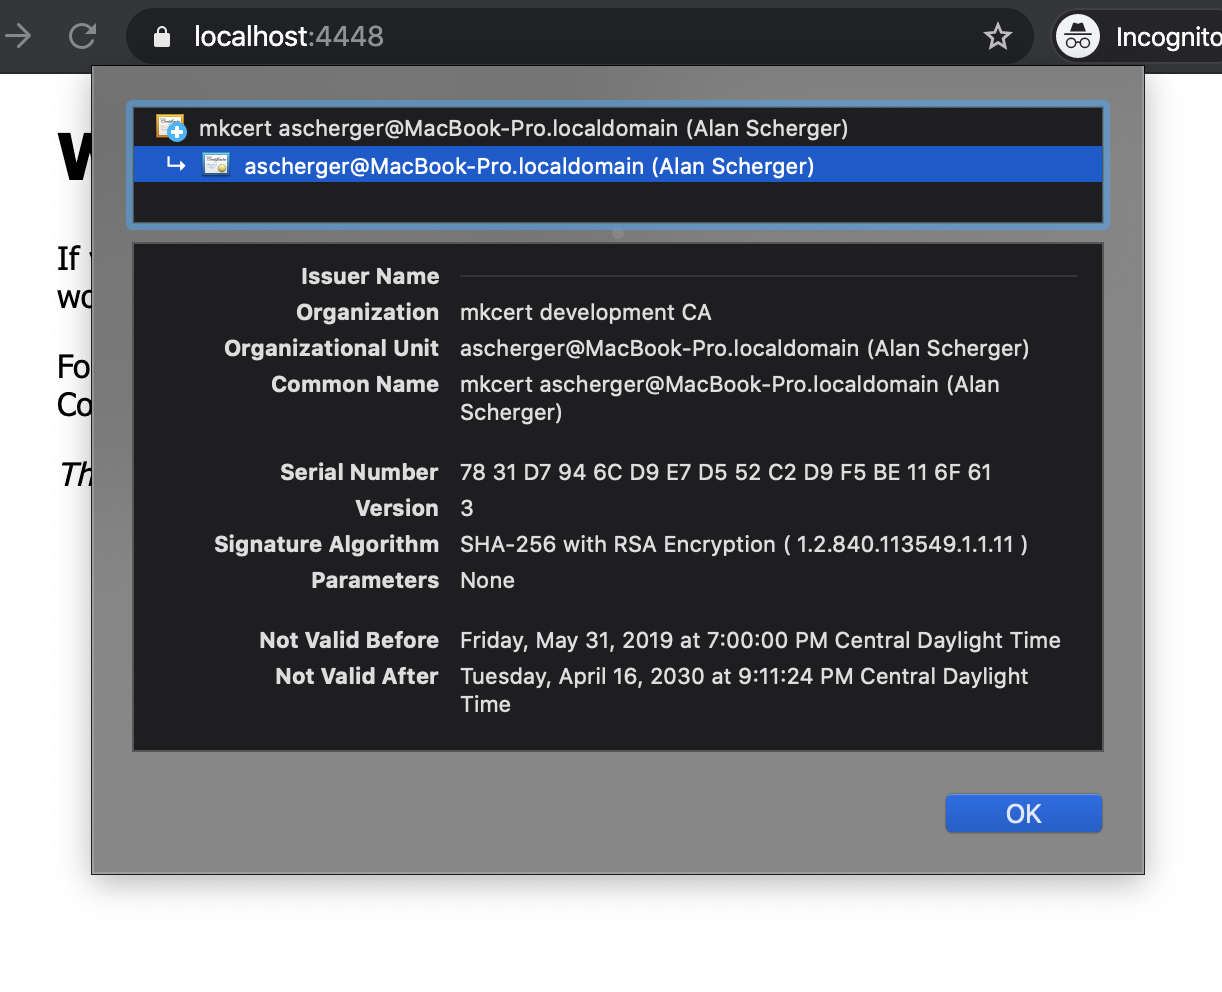
Where you can see that this certificate is trusted because mkcert installs the Root CA
is installed as a trusted certificate in your system.
Similarly, you can see that this server certificate is in use when you compare the Serial Number.